[TOC]
模块化的理解
什么是模块化
- 将一个复杂的程序依据一定的规则(规范)封装成几个块(文件),并进行组合在一起;
- 块的内部数据/实现是私有的,只是向外部暴露一些接口(方法)与外部其它模块通信。
为什么要模块化?
- 降低代码复杂度;
- 降低代码的耦合度;
模块化的好处
- 避免变量污染,命名冲突(减少命名空间污染,因为模块中的数据都是私有的);
- 更好的分离,按需加载;
- 提高代码复用率;
- 提高了可维护性(将散落在多个文件中的公共代码提取成公共模块,方便了代码的集中修改);
- 方便依赖关系管理
模块化的一些问题
- 请求过多(由一个模块拆分出的多个模块,增加了 http 请求数量);
- 依赖模糊(各个模块之前的引入顺序不能颠倒);
- 难以维护。
模块化的进化史
全局 function 模式
问题:污染全局命名空间,容易引起命名冲突或数据不安全,而且模块成员之间看不出直接关系。
来看个 🌰:
// module1.js
/**
 * 全局函数模式: 将不同的功能封装成不同的全局函数
 * 问题:Global被污染了,容易引起命名冲突
 */
var a = 'module1';
function foo() {
  console.log(`${a} foo`);
}
function bar() {
  console.log('module1 bar');
}
2
3
4
5
6
7
8
9
10
11
12
// module2.js
var a = 'module2';
function foo() {
  console.log(`${a} foo`);
}
2
3
4
5
<body>
  <script src="./module1.js"></script>
  <script src="./module2.js"></script>
  <script>
    foo(); // module2 foo
    bar(); // module1 bar
    a = 'test123';
    foo(); // test123 foo
  </script>
</body>
2
3
4
5
6
7
8
9
10
从上述例子的结果,可以得出结论:全局函数模式容易造成命名冲突,会导致后者覆盖前者,module2 中的变量和函数会覆盖 module1 中的。
简单封装:Namespace 模式
const myModule = {
  data: 'www.baidu.com',
  foo() {
    console.log(`foo() ${this.data}`);
  },
  bar() {
    console.log(`bar() ${this.data}`);
  },
};
myModule.data = 'other data'; // 能直接修改模块内部的数据
myModule.foo(); // foo() other data
2
3
4
5
6
7
8
9
10
11
- 作用: 减少了全局变量数量,解决命名冲突;
- 问题: 本质是对象,一点都不安全(外部可以直接修改模块内部的数据)。这样的写法会暴露所有模块成员,内部状态可以被外部改写。
来看个 🌰:
/**
 * module1.js
 * namespace模式: 简单对象封装
 * 作用: 减少了全局变量数量
 * 问题: 不安全(数据不是私有的,外部可以直接修改)
 */
const myModule = {
  name: 'module1',
  foo() {
    console.log(`foo() ${this.name}`);
  },
  bar() {
    console.log(`bar() ${this.name}`);
  },
};
2
3
4
5
6
7
8
9
10
11
12
13
14
15
<body>
  <script src="./module1.js"></script>
  <script>
    myModule.foo(); // foo() module1
    myModule.bar(); // bar() module1
    // 可以直接修改module1模块中的变量
    myModule.name = 'module666';
    myModule.foo(); // foo() module666
    myModule.bar(); // bar() module666
  </script>
</body>
2
3
4
5
6
7
8
9
10
11
匿名函数自执行(闭包):IIFE 模式
- 作用: 数据是私有的, 外部只能通过暴露的方法操作;
- 编码: 将数据和行为封装到一个函数内部, 通过给 window 添加属性来向外暴露接口;
- 问题: 如果当前这个模块依赖另一个模块怎么办?
来看个 🌰:
var Module = (function () {
  var _private = '内部变量';
  var foo = function () {
    console.log(_private);
  };
  return { foo };
})();

Module.foo(); // 内部变量
Module._private; // undefined
2
3
4
5
6
7
8
9
10
再看个 🌰:
/**
 * IIFE模式: 匿名函数自执行(闭包)
 * IIFE : immediately-invoked function expression(立即调用函数表达式)
 * 作用: 数据是私有的,外部只能通过暴露的方法操作
 * 问题: 如果当前这个模块依赖另一个模块怎么办?
 */
(function (window) {
  const a = 'module';
  // 特权方法-操作数据的函数
  function foo() {
    console.log(`foo() ${a}`);
  }
  function bar() {
    console.log(`bar() ${a}`);
    fn();
  }
  // 内部私有函数
  function fn() {
    console.log('我是内部私有函数');
  }
  // 暴露属性和方法
  window.myModule = { foo, bar };
})(window);
2
3
4
5
6
7
8
9
10
11
12
13
14
15
16
17
18
19
20
21
22
23
<body>
  <script src="./module.js"></script>
  <script>
    myModule.foo(); // foo() module
    myModule.bar(); // bar() module 我是内部私有函数
    console.log(myModule.a); // undefined 不能访问模块内部数据a,因为没有对外暴露a
    myModule.a = '全局'; // 这里不是修改的模块内部的a
    myModule.foo(); // foo() module
    // 模块内部的a并没有被改变
  </script>
</body>
2
3
4
5
6
7
8
9
10
11
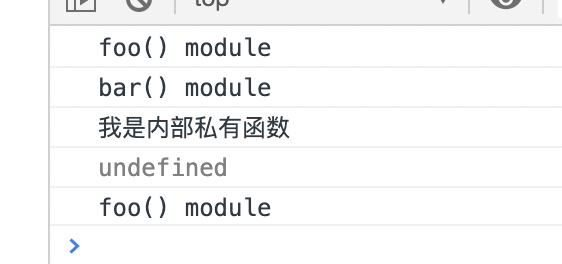
执行结果如下:

函数是 JavaScript 唯一的局部作用域(Local Scope)。
IIFE 模式增强: 引入依赖
这就是模块模式,也是现代模块实现的基石。 来看个 🌰:
var Module = (function ($) {
  var _$body = $('body'); // we can use jQuery now!
  var foo = function () {
    console.log(_$body); // 特权方法
  };
  return { foo };
})(jQuery);

Module.foo();
2
3
4
5
6
7
8
9
再看个 🌰:
/**
 * module.js
 * IIFE模式增强: 引入依赖
 * 引入依赖的形式是通过形参来引入的
 * 这是现代模块化实现的基石
 */
(function (window, $) {
  const a = 'module';
  // 特权方法-操作数据的函数
  function foo() {
    console.log(`foo() ${a}`);
    $('body').css('background', 'yellow');
  }
  function bar() {
    console.log(`bar() ${a}`);
    fn(); // 调用内部私有函数
  }
  // 内部私有函数
  function fn() {
    console.log('我是内部私有函数');
  }
  // 暴露属性和方法
  window.myModule = { foo, bar };
})(window, jQuery);
2
3
4
5
6
7
8
9
10
11
12
13
14
15
16
17
18
19
20
21
22
23
24
<body>
  <!-- 引入的js必须有一定顺序 -->
  <script src="./jquery.js"></script>
  <script src="./module.js"></script>
  <script>
    myModule.foo();
    myModule.bar();
  </script>
</body>
2
3
4
5
6
7
8
9
在上述例子中,通过 jquery 方法将页面的背景颜色改成黄色,所以必须先引入 jQuery 库,并把jQuery当作参数传入。这样做除了保证模块的独立性,还使得模块之间的依赖关系变得明显。
同步/阻塞式加载
// timeout.js
var EXE_TIME = 2;

(function (second) {
  var start = +new Date();
  while (start + second * 1000 > new Date()) {}
})(EXE_TIME);

console.log('2000ms executed');
2
3
4
5
6
7
8
9
// main.js
require('./timeout'); // sync load
console.log('done!');
2
3
引入多个<script>后出现出现问题
- 请求过多:首先我们要依赖多个模块,那样就会发送多个请求,导致请求过多;
- 依赖模糊:我们不知道他们的具体依赖关系是什么,也就是说很容易因为不了解他们之间的依赖关系导致加载先后顺序出错。
- 难以维护
以上两种原因就导致了很难维护,很可能出现牵一发而动全身的情况导致项目出现严重的问题。 模块化固然有多个好处,然而一个页面需要引入多个 js 文件,就会出现以上这些问题。而这些问题可以通过模块化规范来解决,下面介绍开发中最流行的 commonjs,AMD,ES6,CMD 规范。
模块化规范
模块化规范分类
- 浏览器端
- AMD:异步加载模块,允许指定回调函数(Require.js)。
- CMD:普通模块规范(Sea.js)
- Node 端(服务端)
- CommonJS:该规范加载模块是同步的,也就是说,只有加载完成,才能执行后面的操作。
- 浏览器和 Node 端兼容
- UMD:通用模块规范
- ES6
由于 Node.js 主要用于服务端编程,模块文件一般都已经存在于本地硬盘,所以加载起来比较快,不用考虑非同步加载的方式,所以 CommonJS 规范比较适用。但是,如果是浏览器环境,要从服务器端加载模块,这时就必须采用非同步模式,因此浏览器端一般采用 AMD 规范。
CommonJS
NodeJS 采用 CommonJS 模块规范。
- 每个文件就是一个模块,有自己的作用域。**在一个文件里面定义的变量、函数、类,都是私有的,对其他文件不可见。
- 在服务器端,模块的加载是运行时同步加载**的。
- 在浏览器端,CommonJS 模块需要提前编译打包处理。
特点
- 所有代码都运行在模块作用域,不会污染全局作用域。
- 模块可以多次加载,但是只会在第一次加载时运行一次,然后运行结果就被缓存了,以后再加载,就直接读取缓存结果。要想让模块再次运行,必须清除缓存。
- 模块加载的顺序,按照其在代码中出现的顺序。
基本语法
- 暴露模块:module.exports = value 或 exports.xxx = value;两者暴露的都是 exports 对象。
- 引入模块:require('xxx'),如果是第三方模块,xxx 为模块名;如果是自定义模块,xxx 为模块文件路径。
CommonJS 暴露的模块到底是什么?
CommonJS 规范规定:每个模块内部,module 变量代表当前模块。这个变量是一个对象,它的 exports 属性(即 module.exports)是对外的接口。加载某个模块,其实是加载该模块的 module.exports 属性。因此,CommonJS 暴露的模块就是一个对象。
// test.js
const a = 12;
const add = (x) => {
  return x + a;
};

module.exports.a = a;
module.exports.add = add;
2
3
4
5
6
7
8
上面代码中通过 module.exports 输出变量 a 和函数 add。
const test = require('./test.js');

console.log(test); // { a: 12, add: [Function: add] }
console.log(test.a); // 12
console.log(test.add(2)); // 14
2
3
4
5
require 命令用于加载模块文件。其基本功能是:读取并执行对应的 JS 文件,然后返回该模块的 exports 对象。如果没有找到指定模块,会报错。
模块的加载机制
CommonJS 模块的加载机制是:输入的是被输出的值的拷贝。也就是说,一旦输出一个值,模块内部的变化就影响不到这个值。这点与 ES6 模块化有重大差异,请看下面这个例子:
// a.js
let counter = 1;
function addCounter() {
  counter++;
}
module.exports = {
  counter,
  addCounter,
};
2
3
4
5
6
7
8
9
上面代码输出内部变量 counter 和改写这个变量的内部方法 incCounter。
// b.js
const { counter, addCounter } = require('./a.js');

console.log(counter); // 1
addCounter();
console.log(counter); // 1
2
3
4
5
6
由上述代码结果可以看出,counter 输出以后,a.js 模块内部的变化就影响不到 counter 了。这是因为 counter 是一个原始类型的值,会被缓存。除非写成一个函数,才能得到内部变动后的值。
Node 环境(即服务端使用 CommonJS 规范)
/**
 * module1.js
 * 使用module.exports = value向外暴露一个对象
 */
module.exports = {
  msg: 'module1 foo()',
  foo() {
    console.log(this.msg);
  },
};
2
3
4
5
6
7
8
9
10
/**
 * module2.js
 * 使用module.exports = value向外暴露一个函数
 */
module.exports = function () {
  console.log('module2');
};
2
3
4
5
6
7
/**
 * module3.js
 * 使用exports.xxx = value向外暴露一个对象
 */
exports.foo = function () {
  console.log('module3 foo()');
};

exports.bar = function () {
  console.log('module3 bar()');
};
2
3
4
5
6
7
8
9
10
11
// app.js
/**
 * 暴露模块
 * module.exports = value
 * exports.xxx = value
 * 引入模块
 * var module = require(xxx)
 * 第三方模块:xxx为模块名称
 * 自定义模块:xxx为模块文件路径
 */
const uniq = require('uniq');
const module1 = require('./modules/module1'); // module1导出的是一个对象
const module2 = require('./modules/module2'); // module2导出的是一个函数
const module3 = require('./modules/module3'); // module3导出的也是一个对象

module1.foo();
module2();
module3.bar();
module3.foo();
console.log(uniq([1, 2, 2, 1, 1, 3, 11]));
2
3
4
5
6
7
8
9
10
11
12
13
14
15
16
17
18
19
20
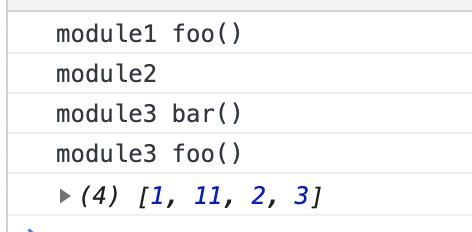
结果如下:
module1 foo()
module2
module3 bar()
module3 foo()
[ 1, 11, 2, 3 ]
2
3
4
5
浏览器环境使用 CommonJS 规范
CommonJS 规范在浏览器端实现需要借助 Browserify。
yarn global add browserify
代码和 Node 环境下一致,只不过 app.js 需要用 browserify 编译一下。
browserify src/app.js -o dist/build.js
<body>
  <!-- Browserify:浏览器加载Node.js模块 -->
  <script src="./dist/build.js"></script>
</body>
2
3
4
结果如下:

AMD 规范
AMD 全称为 Asynchronous Module Definition(异步模块定义)。专门用于浏览器端,模块的加载是异步的。
AMD 规范基本语法
定义暴露模块:
// 定义没有依赖的模块
define(function () {
  return 模块;
});
// 定义有依赖的模块
// 显示声明依赖注入
define(['module1', 'module2'], function (m1, m2) {
  return 模块;
});
2
3
4
5
6
7
8
9
引入使用模块:
require(['module1', 'module2'], function (m1, m2) {
  // 使用m1和m2
});
2
3
未使用 AMD 规范
// 定义一个无依赖模块dataService.js
(function (window) {
  let a = 'test';
  function foo() {
    return a.toUpperCase();
  }
  window.dataService = { foo };
})(window);
2
3
4
5
6
7
8
// 定义一个有依赖的模块alerter.js,依赖dataService
(function (window, dataService) {
  let b = 'work';
  function showMsg() {
    console.log(`${dataService.foo()}-${b}`);
  }
  window.alerter = { showMsg };
})(window, dataService);
2
3
4
5
6
7
8
// main.js
(function (alerter) {
  alerter.showMsg(); // TEST-work
})(alerter);
2
3
4
<body>
  <script src="./js/modules/dataService.js"></script>
  <script src="./js/modules/alerter.js"></script>
  <script src="./js/main.js"></script>
</body>
2
3
4
5
这种方式缺点很明显:
- 首先会发送多个请求;
- 其次引入的 js 文件顺序不能搞错,否则会报错。
AMD 规范实现(浏览器端)
要在浏览器端使用 AMD 规范需要引入 require.js。 RequireJS 是一个工具库,主要用于浏览器端的模块管理。它的模块管理遵守 AMD 规范,RequireJS 的基本思想是:通过 define 方法,将代码定义为模块;通过 require 方法,实现代码的模块加载。 接下来介绍 AMD 规范在浏览器实现的步骤:
下载 require.js,并引入。
然后将 require.js 导入项目: js/libs/require.js
// 定义一个无依赖的模块dataService.js
define(function () {
  let a = 'test666';
  function foo() {
    return a.toUpperCase();
  }
  return { foo };
});
2
3
4
5
6
7
8
// 定义一个有依赖的模块alerter.js
define(['dataService', 'jquery', 'underscore'], function (dataService, $, _) {
  let b = 'work';
  let arr = [1, 2, 3];
  function showMsg() {
    $('body').css('background', 'red');
    console.log(`${dataService.foo()}-${b}`);
    let sum = _.reduce(arr, (a, b) => a + b, 0);
    console.log(sum);
  }
  // 暴露模块
  return { showMsg };
});
2
3
4
5
6
7
8
9
10
11
12
13
// custom.js
const obj = {
  test() {
    console.log('这里非标准的AMD');
    $('#box').css('background', 'green');
  },
};
2
3
4
5
6
7
// main.js
(function () {
  require.config({
    baseUrl: 'js/', // 基础路径,出发点在根目录下
    paths: {
      // 配置模块路径
      // 映射:模块标识名:路径
      alerter: './modules/alerter', // 注意这里alerter不能加后缀.js
      dataService: './modules/dataService',
      jquery: './libs/jquery', // 引入第三方库,注意:写成jQuery: './libs/jquery'会报错,
      underscore: './libs/underscore',
      custom: './modules/custom',
    },
    shim: {
      // shim可以理解成'垫片',用来帮助require.js加载非AMD规范的库
      custom: {
        deps: ['jquery'],
        exports: 'obj', // 这里的obj是因为custom.js定义的对象名称就是obj
      },
    },
  });
  require(['alerter', 'custom'], function (alerter, custom) {
    alerter.showMsg();
    custom.test();
  });
})();
2
3
4
5
6
7
8
9
10
11
12
13
14
15
16
17
18
19
20
21
22
23
24
25
26
需要注意:设置了 baseUrl,就会从 baseUrl 目录下去寻找对应的模块。比如alerter: './modules/alerter',就会去js/modules/alerter下寻找。不设置的话,就会去 main.js 所在目录下寻找。
<body>
  <div id="box">我是非标准的AMD</div>
  <script data-main="js/main.js" src="js/libs/require.js"></script>
</body>
2
3
4
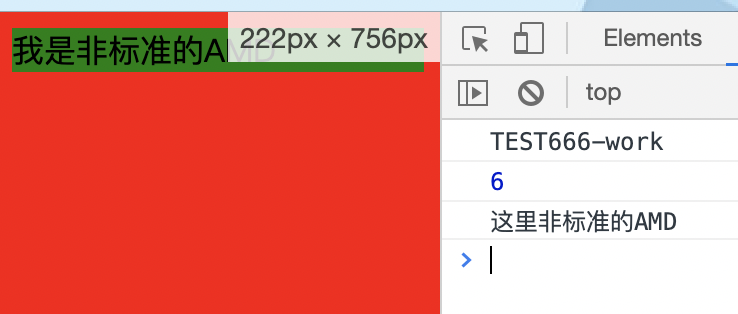
结果如下:


jquery: './libs/jquery'; // 引入第三方库,注意:写成jQuery: './libs/jquery'会报错
jQuery 源码中有如下定义:当 jquery 在 AMD 规范下使用时,其内部自定义了一个 jquery 模块。所以,必须要写成 jquery 而不是 jQuery。

上例是在 alerter.js 文件中引入 jQuery 第三方库,main.js 文件也要有相应的路径配置。
总结:AMD 模块定义的方法非常清晰,不会污染全局环境,能够清楚地显示依赖关系。AMD 模式可以用于浏览器环境,并且允许非同步加载模块,也可以根据需要动态加载模块。
AMD vs CommonJS
书写风格
// Module/1.0 CommonJS
const a = require('./a'); // 依赖就近
a.doSomething();

const b = require('./b');
b.doSomething();
2
3
4
5
6
// AMD recommended style
define(['a', 'b'], function (a, b) {
  // 依赖前置
  a.doSomething();
  b.doSomething();
});
2
3
4
5
6
执行时机
// Module/1.0
var a = require('./a'); // 执行到此时,a.js 同步下载并执行
2
// AMD with CommonJS sugar
define(['require'], function (require) {
  // 在这里, a.js 已经下载并且执行好了
  var a = require('./a');
});
2
3
4
5
CMD 规范
CMD 即 Common Module Definition(普通模块定义)。
- CMD 规范专门用于浏览器端,模块的加载是异步的;
- 模块使用时才会加载执行。
CMD 规范整合了 CommonJS 和 AMD 规范的特点。在 Sea.js 中,所有 JS 模块都遵循 CMD 模块定义规范。
使用 Sea.js:Sea.js 结合了 CommonJS 和 AMD 两种规范,定义模块采用 AMD 规范的 define 方式,导出模块采用 CommonJS 的 module.exports 和 exports 方式。
- 引入 sea.js 库;
- 定义和导出模块; define() exports module.exports
- 引入依赖模块; require()
- 使用模块; seajs.use()
CMD 基本语法
定义暴露模块
// 定义没有有依赖的模块
define(function (require, exports, module) {
  exports.xxx = value;
  module.exports = value;
});
2
3
4
5
// 定义有依赖的模块
// require, exports, module类似于CommonJS规范
// define语法类似于AMD规范
// 因此CMD规范是结合了AMD和CommonJS规范
define(function (require, exports, module) {
  // 引入依赖模块(同步)
  const module2 = require('./module2');
  // 引入依赖模块(异步)
  require.async('./module3', function (m3) {});
  // 暴露模块
  exports.xxx = value;
});
2
3
4
5
6
7
8
9
10
11
12
引入模块:
define(function (require) {
  const module1 = require('./module1');
  const module4 = require('./module4');
  module1.foo();
  module4.show();
});
2
3
4
5
6
来看个 🌰:
<body>
  <script src="./js/libs/sea.js"></script>
  <script>
    seajs.use('./js/modules/main');
  </script>
</body>
2
3
4
5
6
// main.js
define(function (require) {
  const module1 = require('./module1');
  const module4 = require('./module4');
  module1.foo();
  module4.show();
});
2
3
4
5
6
7
// 定义没有依赖的模块module1.js
define(function (require, exports, module) {
  // 内部变量数据
  const data = 'module1';
  // 内部函数
  function foo() {
    console.log('module1 show() ' + data);
  }
  //向外暴露
  exports.foo = foo;
});
2
3
4
5
6
7
8
9
10
11
// 定义没有依赖的模块module2.js
define(function (require, exports, module) {
  module.exports = {
    msg: 'module2',
  };
});
2
3
4
5
6
// module3.js
define(function (require, exports, module) {
  exports.a = 'module3';
});
2
3
4
// 定义有依赖的模块module4.js
define(function (require, exports, module) {
  // 引入依赖模块(同步)
  const module2 = require('./module2');
  function show() {
    console.log('module4 show() ' + module2.msg);
  }
  exports.show = show;
  // 引入依赖模块(异步)
  require.async('./module3', function (m3) {
    console.log('异步引入依赖模块3 ' + m3.a);
  });
});
2
3
4
5
6
7
8
9
10
11
12
13
结果如下:

AMD vs CMD(真正的区别在于执行时机不同)
// AMD规范
define(['a', 'b'], function (a, b) {
  a.doSomething(); // 依赖前置,提前加载依赖
  b.doSomething();
});
2
3
4
5
// CMD规范
define(function (require, exports, module) {
  const a = require('a');
  a.doSomething();
  const b = require('b');
  b.doSomething(); // 依赖就近,延迟加载依赖
});
2
3
4
5
6
7
ES6 模块化规范
ES6 模块的设计思想是尽量的静态化,使得编译时就能确定模块的依赖关系,以及输入和输出的变量。CommonJS 和 AMD 模块,都只能在运行时确定模块的依赖关系。比如:CommonJS 模块就是对象,输入时必须查找对象属性。
// 装包
yarn add @babel/core @babel/cli @babel/preset-env --dev
2
//.babelrc
{
    "presets": ["@babel/preset-env"]
}
2
3
4
使用 Babel 将 ES6 编译为 ES5 代码(但包含 CommonJS 语法):
npx babel js/src -d js/dist
使用Browserify编译 js,处理 CommonJS 语法。
browserify js/dist/app.js -o js/dist/build.js
<body>
  <script src="./js/dist/build.js"></script>
</body>
2
3
// app.js
import { foo, bar } from './module1';
import { fun1, fun2 } from './module2';
// 也可以通过这种方式全部引入
import * as fn from './module2';
import module3 from './module3';

console.log(fn);
fn.fun1();
console.log('---------');
foo();
bar();
fun1();
fun2();
module3();
2
3
4
5
6
7
8
9
10
11
12
13
14
15
// module1.js
// 分别暴露
export function foo() {
  console.log('foo() module1');
}
export function bar() {
  console.log('bar() module1');
}
2
3
4
5
6
7
8
// module2.js
// 统一暴露
function fun1() {
  console.log('fun1() module2');
}
function fun2() {
  console.log('fun2() module2');
}
export { fun1, fun2 };
2
3
4
5
6
7
8
9
// module3.js
// 默认暴露 可以暴露任意数据类项,暴露什么数据,接收到就是什么数据
// 默认暴露在每个模块中只能使用一次,多次使用会报错
export default () => {
  console.log('默认暴露');
};
2
3
4
5
6
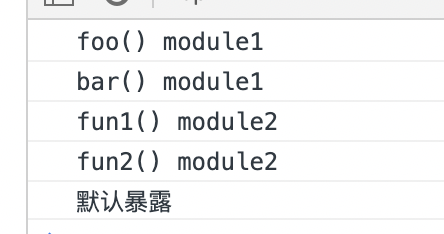
结果如下:

再来看个 🌰:
// 导出变量
export const a = 123;

// 导出方法-方式1
export function sayName() {
  console.log('lisi');
}

// 导出方法-方式2
function sayAge() {
  console.log(12);
}

export { sayAge };

// export default导出
const b = 321;
// export default const b = 321; 不支持这样书写
export default b;
2
3
4
5
6
7
8
9
10
11
12
13
14
15
16
17
18
19
import { sayName, sayAge } from './testES6Export';
import b from './testES6Export';
// as导出是把零散的export聚集在一起作为一个对象,而export default是导出为对象的default属性。
import * as testModule from './testES6Export';

console.log(b);
sayName();
sayAge();
console.log(testModule);
console.log(testModule.b); // undefined
console.log(testModule.default); // 321
console.log(testModule.a); // 123
2
3
4
5
6
7
8
9
10
11
12
// 执行以下两个命令
npx babel ./src -d ./dist
browserify ./dist/index.js -o ./dist/build.js
2
3
结果如下:

ES6 模块化规范与 CommonJS 的差异
它们有两个重大差异:
- CommonJS 模块输出的是一个值的拷贝,ES6 模块输出的是值的引用;
- CommonJS 模块是运行时加载,ES6 模块是编译时输出接口。
第二个差异是因为 CommonJS 加载的是一个对象(即 module.exports 属性),该对象只有在脚本运行完才会生成。而 ES6 模块不是对象,它的对外接口只是一种静态定义,在代码静态解析阶段就会生成。
下面重点解释第一个差异,我们还是举上面那个 CommonJS 模块的加载机制例子:
// a.js
export let counter = 3;
export function incCounter() {
  counter++;
}
// b.js
import { counter, incCounter } from './a';
console.log(counter); // 3
incCounter();
console.log(counter); // 4
2
3
4
5
6
7
8
9
10
// 执行
npx babel-node b.js
2
ES6 模块的运行机制与 CommonJS 不一样。ES6 模块是动态引用,并且不会缓存值,模块里面的变量绑定其所在的模块。 CommonJS 和 ES6 Module 究竟有什么区别?
总结
- CommonJS 规范主要用于服务端编程,加载模块是同步的,这并不适合在浏览器环境,因为同步意味着阻塞加载,浏览器资源是异步加载的,因此有了 AMD CMD 解决方案。
- AMD 规范在浏览器环境中异步加载模块,而且可以并行加载多个模块。不过,AMD 规范开发成本高,代码的阅读和书写比较困难,模块定义方式的语义不顺畅。
- CMD 规范与 AMD 规范很相似,都用于浏览器编程,依赖就近,延迟执行,可以很容易在 Node.js 中运行。不过,依赖 SPM 打包,模块的加载逻辑偏重。
- ES6 在语言标准的层面上,实现了模块功能,而且实现得相当简单,完全可以取代 CommonJS 和 AMD 规范,成为浏览器和服务器通用的模块解决方案。
参考博文
- 前端模块化详解(完整版)
- ES6 系列之模块加载方案
- javascript 中的 define 用法
- JavaScript 模块化七日谈
- 前端模块化开发那点历史
- 浅析 JS 模块规范:AMD 和 CMD
- CMD 模块定义规范
- AMD (中文版)
- AMD, CMD, CommonJS 和 UMD
- 研究一下 javascript 的模块规范(CommonJs/AMD/CMD)
- Javascript 模块化编程(三):require.js 的用法
- Javascript 模块化编程(二):AMD 规范
- Javascript 模块化编程(一):模块的写法
- 前端模块化之旅(二):CommonJS、AMD 和 CMD
- Module 的语法
- javascript 模块化之 CommonJS、AMD、CMD、UMD、ES6
- requireJs 的配置详解
- 30 分钟学会前端模块化开发