插件安装和配置
第一步:在项目根目录下安装插件:
yarn add html-webpack-plugin -D
html-webpack-plugin会在项目打包结束后,在打包目录下自动生成一个或者多个html文件(个数由入口文件的个数决定),并把打包生成的js或者css文件自动引入到对应的html文件中。另外,还可以通过向插件传递参数,来控制HTML文件的输出。
第二步:在webpack配置文件中引入该插件:
const htmlWebpackPlugin = require('html-webpack-plugin');
第三步:在webpack配置文件暴露的对象中添加一个plugins属性,该属性值是一个数组,将新建的html-webpack-plugin对象实例添加到数组中。若不传入任何参数,那么插件将生成默认的html文件。
module.exports = {
    entry: {
        main:'./src/index.js'
    },
    output: {
        path: './dist',
        filename: '[name].bundle.js'
    },
    plugins:[
        new htmlWebpackPlugin()
    ]
}
2
3
4
5
6
7
8
9
10
11
12
第四步:配置参数,为新建的对象实例传入一个对象字面量参数,初始化对象实例的属性。
module.exports = {
    plugins:[
        new htmlWebpackPlugin({
            filename: 'index.html',
            template: './src/index.html',
            inject: false,
            title: 'html模板',
            // 包含的chunk
            chunks: ['main']
        })
   ]
}
2
3
4
5
6
7
8
9
10
11
12
htmlWebpackPlugin对象
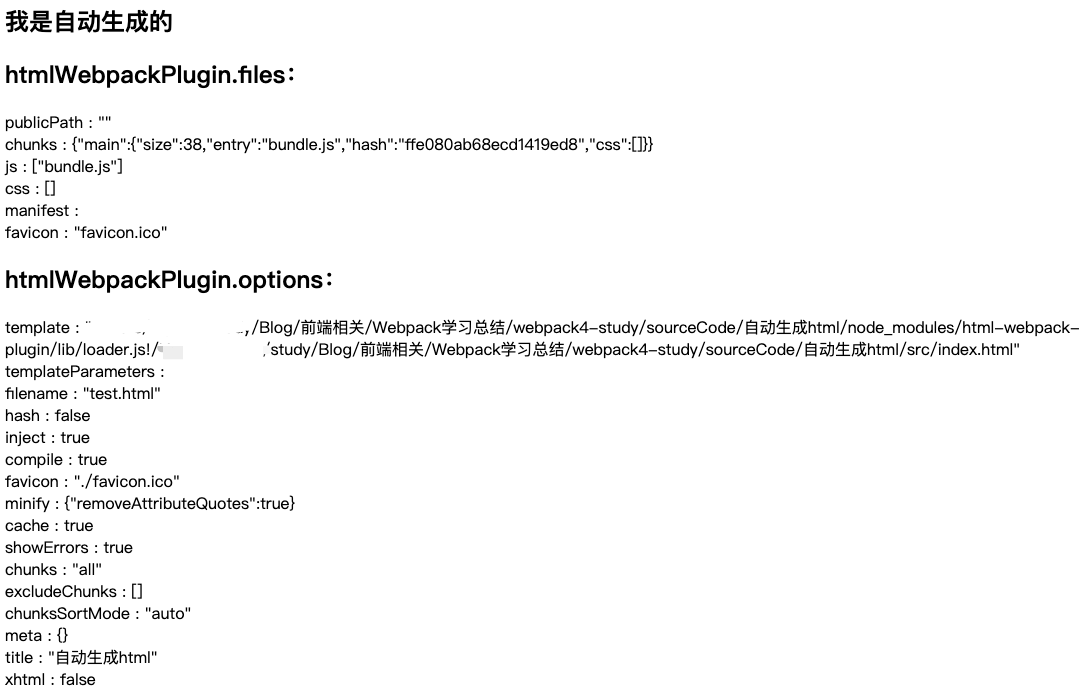
htmlWebpackPlugin对象有两个属性,一个是files,一个是options。这两个属性的值都是对象。通过ejs语法,可以在html模板文件中遍历这两个属性:
<% for(var key in htmlWebpackPlugin.files) { %>
    <%= key %> : <%= JSON.stringify(htmlWebpackPlugin.files[key]) %> //将对象或数组转换为JSON字符串。
<% } %>

<% for(var key in htmlWebpackPlugin.options) { %>
    <%= key %> : <%= JSON.stringify(htmlWebpackPlugin.options[key]) %>
<% } %>
2
3
4
5
6
7
遍历结果如下:

参数说明
- title: 指定生成页面的title;
- filename: 生成的html文件的文件名。默认index.html,可以直接配置带有子目录;
- template: 指定生成的html文件所依赖的模板文件,模板类型可以是html、jade、ejs等。但是要注意的是,如果想使用自定义的模板文件时,需要安装对应的loader。
举个🌰:
yarn add ejs-loader -D
loaders: {
    ...
    {
        test: /\.ejs$/,
        loader: 'ejs-loader'
    }
}
plugins: [
    new HtmlWebpackPlugin({
        ...
        ejs: 'path/to/yourfile.ejs'
    })
]
2
3
4
5
6
7
8
9
10
11
12
13
- inject: 添加所有的静态资源文件到模板文件,有以下四个值:
- true:默认值,所有打包后的脚本文件都插入到html文件的body底部;
- body:效果与true相同,所有打包后的脚本文件都插入到html文件的body底部;
- head:所有打包后的脚本文件都插入到html文件的head标签中;
- false(用不到):所有打包后的脚本文件都不会被自动添加到HTML模板文件中。
- favicon: 给生成的html文件生成一个favicon,值是一个路径:
plugins: [
    new HtmlWebpackPlugin({
        favicon: 'path/to/favicon.ico'
    })
2
3
4
然后在生成的html中就会生成对应的link标签:
<link rel="shortcut icon" href=favicon.ico>
- minify: 使用该属性会对生成的html文件进行压缩,默认是false。html-webpack-plugin内部集成了html-minifier。因此,还可以对minify进行配置。注意,虽然minify支持BooleanObject,但是不能直接这样写:minify: true,这样会报错
ERROR in TypeError: Cannot use 'in' operator to search for 'html5' in true,使用时候必须给定一个{}对象。具体配置如下:
plugins: [
    new HtmlWebpackPlugin({
        ...,
        minify: {
            removeAttributeQuotes: true, // 移除属性的引号
            collapseWhitespace: true // 折叠空行变成一行
        }
    })
]
2
3
4
5
6
7
8
9
- hash: 默认值为false,如果值为true,就添加一个唯一的webpack compilation hash(本次webpack编译的hash值)给所有已经添加的
js脚本和CSS文件,这对清除缓存十分有用。 - cache: 默认值是true,表示内容变化的时候生成一个新的文件。
- showErrors: 默认值为true,当webpack报错的时候,详细的错误信息将被包裹在一个pre中输入到HTML页面中。
- chunks: 允许我们只对页面添加部分chunks,主要用于多入口文件的情况。当有多个入口文件时,打包后就会生成多个文件,那么chunks项用于设置想要使用的js文件,具体配置如下:
entry: {
    index: path.resolve(__dirname, './src/index.js'),
    vender: path.resolve(__dirname, './src/vender.js'),
    main: path.resolve(__dirname, './src/main.js')
}

plugins: [
    new htmlWebpackPlugin({
        chunks: ['index', 'vender']
    })
]
2
3
4
5
6
7
8
9
10
11
那么编译打包后将只包含如下两个文件:
<script type=text/javascript src="index.js"></script>
<script type=text/javascript src="vender.js"></script>
2
如果没有设置chunks选项,那么默认是全部包含。
- excludeChunks: 排除掉不需要的js脚本(与chunks属性正好相反)。
// 等价于上面的配置
excludeChunks: ['main.js']
2
- chunksSortMode: 在chunks被加入到html文件前,允许控制chunks应当如何被排序。值可以为:
'none','manual','auto','dependency',{function},默认值:'auto'。- dependency:按照不同文件的依赖关系来排序;
- auto:默认值,插件的内置的排序方式;
- none:无序;
- manual: chunks按引入的顺序排序, 即属性chunks的顺序;
- {function}:自定义指定具体的排序规则。
- xhtml: 默认值是false,如果为true,则以兼容xhtml的模式引用文件。
特殊情况:使用ejs语法向HTML模板文件手动添加打包后的脚本文件
- 由于inject参数不能被同时设置为head和body,因此,当有的打包后的脚本文件需要被添加到head标签,而另外的需要被添加到body标签中时,就需要手动向HTML模板注入脚本。
<head>
    <script src="<%= htmlWebpackPlugin.files.chunks.main.entry %>"></script>
</head>
<body>
<% for(let k in htmlWebpackPlugin.files.chunks){ %>
    <% if(k!=='main'){ %>
    <script src="<%= htmlWebpackPlugin.files.chunks[k].entry %>"></script>
    <% } %>
<% } %>
</body>
2
3
4
5
6
7
8
9
10
- 为了网页的加载性能,减少HTTP请求,当有的打包后的脚本文件需要被内嵌到head标签中,而其余的需要以外部资源的方式添加到HTML模板中时,也需要手动向HTML模板注入脚本。
<head>
    ...
    <script type="text/javascript" src="<%= compilation.assets[htmlWebpackPlugin.files.chunks.main.entry.substr(htmlWebpackPlugin.files.publicPath.length)].source() %>"></script>
</head>

<body>
<% for(var k in htmlWebpackPlugin.files.chunks){ %>
    <% if(k!=='main'){ %>
    <script src="<%= htmlWebpackPlugin.files.chunks[k].entry %>"></script>
    <% } %>
<% } %>
</body>
2
3
4
5
6
7
8
9
10
11
12
多页面应用(MPA)打包(生成多个HTML文件)
概念理解:每一次页面跳转的时候,后台服务器都会返回一个新的html文档,这种类型的网站也就是多页面网站,也叫作多页面应用。
多页面应用优势:
- 各个页面之间是解耦的;
- 对SEO更加友好。
当开发一个多页面应用程序,那么我们就需要为不同的页面生成不同的HTML文件,通过向plugins数组添加多个插件实例就可以实现。所以多页面应用打包的基本思路是:每个页面对应一个entry和一个HtmlWebpackPlugin。这种方式的缺点是:每次新增或者删除页面都需要更改webpack配置。具体配置如下:
module.exports = {
  entry: {
      index: './src/index.js',
      sub: './src/sub.js'
  },
  output: {
    path: './dist',
    filename: '[name].bundle.js'
  },
  plugins: [
    new HtmlWebpackPlugin({
        filename: 'index.html',
        template: './src/index.html',
         chunks: ['index'] // 只引入打包后的index.js
    }), // 生成index.html
    new HtmlWebpackPlugin({  // 生成sub.html
         filename: 'sub.html',
         template: './src/index.html',
         chunks: ['sub'] // 只引入打包后的sub.js
    })
  ]
}
2
3
4
5
6
7
8
9
10
11
12
13
14
15
16
17
18
19
20
21
22
多页面应用打包通用方案
基本思路:动态获取entry和设置html-webpack-plugin数量。需要用到glob.sync。
需要注意:这种方式的前提是所有入口文件都必须放在单独的目录下,入口文件名为index.js,如下所示:search页面的入口为search/index.js。
├── src
│   ├── index
│   │   ├── helloworld.js
│   │   ├── index.html
│   │   └── index.js
│   └── search
│       ├── images
│       ├── index.html
│       ├── index.js
│       ├── meta.html
│       └── search.less
├── webpack.config.js
2
3
4
5
6
7
8
9
10
11
12
yarn add glob -D
const setMPA = () => {
    const entry = {};
    const htmlWebpackPlugins = [];
    const entryFiles = glob.sync(path.join(__dirname, './src/*/index.js'));
    // console.log(entryFiles); // 入口文件数组
    entryFiles.map(entryFile => {
        // 正则匹配以src开头
        const match = entryFile.match(/src\/(.*)\/index\.js/);
        // console.log(match);
        const pathName = match && match[1];
        entry[pathName] = entryFile;
        htmlWebpackPlugins.push(
            new HtmlWebpackPlugin({
                inlineSource: '.css$',
                template: path.join(__dirname, `src/${pathName}/index.html`),
                filename: `${pathName}.html`,
                chunks: [pathName],
                inject: true,
                minify: {
                    html5: true,
                    collapseWhitespace: true,
                    preserveLineBreaks: false,
                    minifyCSS: true,
                    minifyJS: true,
                    removeComments: false
                }
            })
        );
    });
    return {
        entry,
        htmlWebpackPlugins
    };
}
2
3
4
5
6
7
8
9
10
11
12
13
14
15
16
17
18
19
20
21
22
23
24
25
26
27
28
29
30
31
32
33
34
坑点汇总
// 不生效
<%= htmlWebpackPlugin.options.title %>
2
是因为webpack.config.js的配置文件里面加了html-loader,加了之后会正常解析html文件作为模版,就会直接把<%= htmlWebpackPlugin.options.title %>解析成字符串。如果有html-loader,去掉就可以了。